
I have been reading about this Oil Cleansing Method for the last few years on various blogs and online articles. My initial reaction was, "Yeah, like I need MORE oil on my skin". I actually have combination skin, but keeping my makeup from sliding off before the end of the day has always been a challenge. In addition to that challenge, I was still having to deal with occasional acne and blackhead problems and troublesome dry, flaky patches. The very last thing I wanted to put on my face was oil. I often used harsh cleansers on my face in an attempt to keep oily areas under control and used products on my face designed to inhibit oil but it was an ongoing battle and the dry areas of my face were getting pretty bad. My age was definitely showing in my skin. I would try expensive moisturizers on the dry areas but the only ones I really thought were helping were just too expensive for me to make a regular part of my daily routine.
I had been treating myself to occasional trips to a nearby spa for relaxing time in the jacuzzi and sauna area. I would splurge on a massage or pedicure once in a while so I decided I would treat myself to my first real spa facial. It was awesome and the aesthetician was very professional and knowledgeable. She told me something about my skin that truly surprised me. She said that my skin was dehydrated and lacked deep moisture. I asked her how that could be when I struggled so much with oily areas. She explained that the excess oil production was caused because I was regularly stripping away the natural oils in my skin and not replacing that with the proper moisturizer. hmmm. I had long ago learned that over-washing my hair caused it to be more oily. She confirmed that this is based on the same principle. My body was working overtime trying to replace the natural oils that I was scrubbing away. Of course she set me up with some amazing natural cleanser, moisturizer, and face serum. It was some awesome stuff and while I did make the initial purchase, I knew that I would not be paying that price for face products on a regular basis. The next time I ran across someone on the internet talking about the oil cleansing method I figured it sure wouldn't hurt to try. Here is the basic method I used:
BASIC OIL CLEANSING METHOD
Get that hair out of the way with a headband Apply a couple tablespoons of oil to face with fingertips and gently massage until entire face is covered (I chose organic coconut oil but I will list some other popular oils later in this post) Soak an absorbent washcloth with hot water (not too hot!) and wring out excess water while still leaving it pretty wet. Lay the steamy cloth over your face and enjoy the warmth until cloth cools to room temperature (doesn't take long) Gently wipe face with cloth and then repeat the Steam/Wipe until your face feels clean.
The first time I tried this I thought my skin felt kind of oily, but resisted the urge to steam/wipe a 4th time. Literally within a couple of minutes my skin had soaked up any trace of oil from the surface and I had soft, smooth skin that wasn't the least bit greasy. It was only a quick step from the basic method to adding my favorite essential oils and even other natural ingredients (like organic honey) to mix up my own face cleansers at home. I no longer have problems with acne breakouts, I no longer have problems with dry skin or oily skin, (my makeup will still slide off after a day of Mississippi summer heat - but that's just because the heat and humidity melt it off!) I immediately began formulating my own facial cleansers, masks, toners and serums using essential oils and other natural ingredients with great results. I never dreamed that I would ever be cleansing my face with oil twice a day, but I can't imagine doing it any other way now. I'm convinced :)
Some Oil Options for your OCM routine
The above list is only a very short list of options and the descriptions of each are by no means exhaustive. The benefits shown are just a few of the many benefits of each that I have selected to share as they relate to skin care specifically.
I recommend that whatever carrier oil you choose, that you make sure it is 100% pure, and preferably organic, for greatest benefit. All of the above oils are ones that I have used in my beauty recipes and I love them all. Since I began making my own oil cleansers and beauty products with essential oils I have seen such a dramatic improvement in my skin. I will share here one of the cleanser recipes I've made. I chose this one because it is the one I am using today. Coconut-Honey Anti-Aging Cleanser
INGREDIENTS:
4 Tbs. Organic Coconut Oil 2 Tbs. Organic Honey 1 Tbs. Jojoba Oil 4 drops Frankincense Essential Oil 2 Drops Geranium Essential Oil 2 Drops Copaiba Essential Oil 2 Drops Lavender Essential Oil Small container (I used a little plastic container I got at the dollar store. I recommend a glass container, but I knew this wouldn't last long enough for the essential oil to degrade the plastic!) TOOLS: Small container of really hot water Metal measuring Tablespoon Spatula or whisk for mixing
Links to items mentioned in this post:
Carrington Farms Organic Coconut Oil
Billy Bee Organic Honey Plant Therapy Jojoba Oil Variety Pack of Carrier Oils This is a handy, reasonably priced set that will give you a variety to try. (Fractionated Coconut oil, Avocado oil, Sweet Almond oil & Grape Seed oil) NOTE: Fractionated coconut oil remains in a liquid state regardless of temperature. If you choose to use fractionated coconut oil in this recipe, there will be no need to melt and your final product will be more liquid in nature than solid. It will still work wonderfully, just make sure you put it in a container that will not leak and may be more prone to separating because the honey is so much heavier. The essential oils used in this particular recipe came from Young Living. You can get a customer account at this link: Young Living Essential Oils or contact your Young Living Distributor. I also use oils from Edens Garden. You can find their oils at amazon using the following link:
You can also order directly from their website: www.edensgarden.com
If you decide to give this recipe a try, I'd love to hear how you like it. Regardless of where you purchase your ingredients, please be sure to use high quality for the best results. Feel free to share your thoughts in the comments.
3 Comments
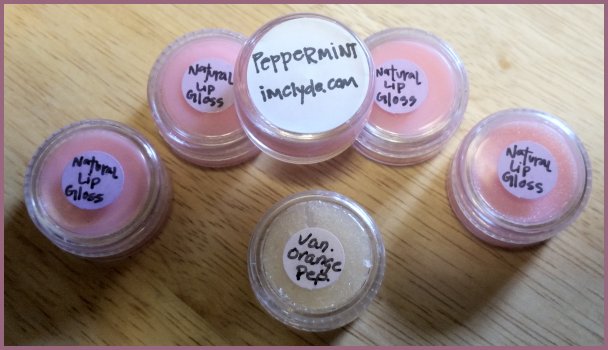
I love peppermint lip balm. I bought a little tube at the spa for $6.50 and used it all the time. It was almost gone and I really didn't want to spend $6.50 to buy another if I could make some myself. There are tons of recipes online for lip balm/lip gloss but most made more than I wanted and some had ingredients I either didn't have or didn't want on my lips.
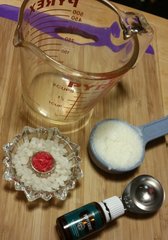
I love coconut oil and use it for all sorts of things, but I knew I needed something in the recipe that would give it a more solid texture when finished. Organic Beeswax pellets seemed a good choice and it was used in many of the recipes I had looked at. I also wanted it to have a little color tint to it to make it look prettier in the container. I was amazed at the many suggestions I saw for tinting lip gloss. Chunks of your favorite lipstick, powdered drink mix, food coloring and crayons were among the many suggestions. The crayon suggestion seemed to be the one that would give the most color options, so I poked around in some of my hidey-holes looking for that box of crayon bits and old colored pencils that I knew was there. I found it. I even found a couple of pink non-toxic crayons in the jumble. What I also found was that "Crayon Smell". I just couldn't bring myself to put that in a lip gloss. Then I spotted some red tealights; left over from some Christmas-Past I'm sure. I figured just a little bit of the soy candle wax wouldn't hurt and it wouldn't take much to tint the small batch I intended to make.
Here are some links where you can find ingredients I used:
Carrington Farms Organic Extra Virgin Coconut Oil, 12 Ounce Organic White Beeswax Pellets by Your Natural Planet - 14 oz - Tested and Certified 100% Organic The peppermint oil I had on hand came from
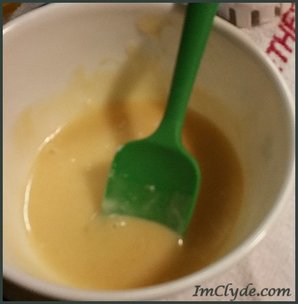
I combined coconut oil, beeswax and candle wax in the glass measuring cup and put it in the microwave for 20-30 seconds at a time, stirring the mixture each time until the waxes were completely melted. (Monitor the melting process very carefully when using a microwave. You could also use a double boiler to melt the ingredients if you prefer).
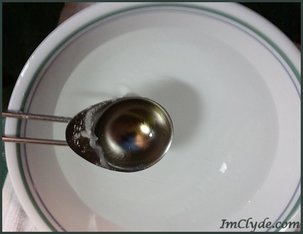
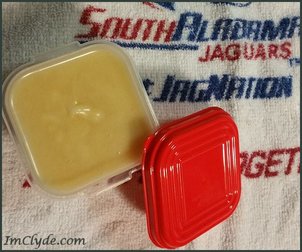
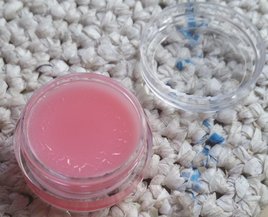
I let the mixture cool just a little bit before I stirred in the essential oil and then started pouring mixture into the containers. By the time I had filled the 5 containers I realized I had plenty left in the measuring cup and it was starting to cool and thicken. I poured some into the empty glass candle holder that I had used to hold the waxes before melting. I still needed another container, so I filled up the metal measuring spoon that was sitting there. Only a small amount remained after that and it was cooling fast. I used a spatula to scrape the sides and put the rest of the mixture into the empty tealight holder. In less than an hour the gloss and solidified nicely. I tried a small sample from one of my oddball containers. The balm liquefied quickly as the coconut oil warmed from the body heat. It was smooth and went on without dragging like some chapsticks can. The coconut oil gave it a really nice gloss. The gloss had a light pink tint in the container that did NOT show up as color on my lips - which was fine with me. It did make my lips soft and shiny and the peppermint tingled nicely.
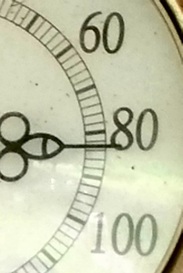
I was gone a bit longer than expected. It was 4pm and about 83 degrees when I came back to check it. You can see in the photos below that it was a bit sweaty on the top, but it was still solid. Glad to see that the beeswax kept the coconut oil from melting at 76-78 degrees as it normally would.
Lip Scrub (in the picture at the top of this post)
There is no need for complicated instructions here! This lip scrub was just Sweet almond oil and Sugar in equal parts (1:1) I added a little vanilla extract, Orange essential oil, and Peppermint essential oil to make the one pictured. I had another batch that was just Peppermint and another that was just Orange/Vanilla (like a creamscicle - yummy)
Just apply a little bit to your lips and scrub lightly. Follow up with a bit of Peppermint lip gloss and your lips will be perfect.
I love bath/beauty products and seem to have acquired many more products than I could ever use. Many of the items I have are for use in the bathtub. Unfortunately, I don't currently have a place to take those long, relaxing baths. It may be awhile before I can remedy that situation, so I figured I should find a way to use some of what I already have to make new products that I can use in the shower and nice gifts for my friends who do have working bathtubs.
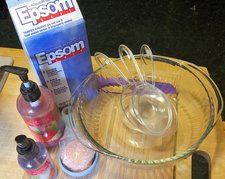
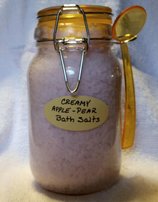
For my first project, I decided to use products from a set I had received as a gift. The scent was a delicious Apple-Pear. I had used most of the body wash and some of the body mist, but there was a small packet of scented bath salts and some foaming bath cream just sitting there. I grabbed them up along with some other ingredients and headed to the kitchen.
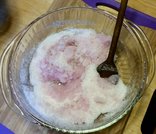
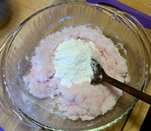
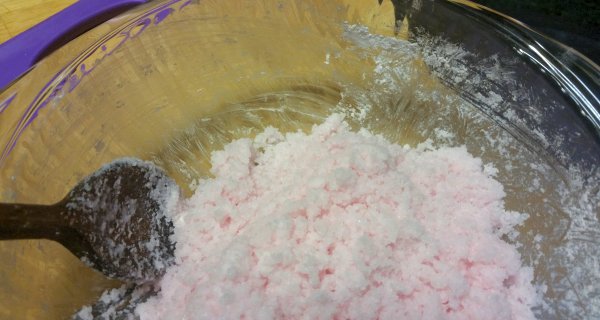
mOnce I had everything mixed up, I smoothed out the mixture in the bowl and brought it up the sides a bit so that it would be about the same thickness before going in the oven (see photo below-left). Only 10 minutes in the oven, and it came out fluffed up (below-center). After letting it cool a little, I folded the mixture and let it sit some more so it would rise and fluff up again. After final cooling, I fluffed it with a fork to make a looser texture and scraped the residue from the sides of the bowl back into the mix (below right).
This finished product made just about 2 cups which fit nicely into my jar. I added a label on the front of the jar as well as a little "use by date" sticker on the top.
Nea’s Creamy Bath Salts
What you Need: 1-3/4 c. Epsom Salts ¼ c. other scented Bath Salts or Sea Salt 8 sprays of scented body mist 1/6 c. (aprox. 1-1/4 oz.) scented creamy bath liquid or Bubble bath ¼ c. baking soda Glass Oven-Safe Bowl Preheat oven to 250 degrees Stir together the Epsom Salts, other Bath Salts in Glass Bowl Spray Body Mist over that mixture 4 times and stir Repeat 4 more sprays of Body Mist and stir again to make sure scent is distributed throughout Stir in the Creamy Bath Liquid (or Bubble Bath) Add in the Baking soda and stir until combined well 250 degrees 10 minutes it puffs up and bubbles a bit on the top Let rest about 20 minutes then fold lightly w/wooden spoon to bring warmer salts to the top Let rest another 20 minutes and gently fold again Let cool completely Fluff with fork scraping any baking soda residue from sides of bowl back into the mix *Make sure it is cooled completely before scooping lightly into airtight glass container making sure not to pack it in tightly. This will be just slightly damper than your average bath salts and it needs room to breathe so that it is easier to spoon out of the jar. Use within 3 months for best results. *The Rest of the Story
What the pictures don't show is that on my first attempt putting the Creamy Bath Salts into the jar, I patted them down a bit to fit the entire 2 cups into my container. I didn't pack it tightly, but I was also apparently mistaken about the mixture being completely cooled. I closed the lid on the jar and promptly ran out the door to spend the evening with friends. When I returned the salts had obviously "risen" inside the jar. With no room for the mixture to grow, the pressure had squeezed the Creamy Bath Salts so that some liquid had leaked out around the seal and ran down the outside of the jar. I had to open the jar and take out the now tightly packed salts that were damp from the warmth in the sealed container. I put them back in the larger bowl and added another 1/4 cup of Epsom salt to help dry them out and let them cool over night before re-fluffing and refilling the jar. So - make sure your mixture is REALLY cooled before putting it in the airtight container you choose.
|
Categories
All
Archives
December 2018

AuthorI'm a curious-by-nature 50-something with random interests. Come visit often to see what the latest topic is.  |


 RSS Feed