So much to explore and so little time *Sigh* I was lucky enough to have someone gift me with a pre-order of the Legion expansion. This gave me the opportunity to create a Demon Hunter a couple of weeks prior to the official launch. The only problem I'm having is that I have so little time right now to indulge in my monster-killing hobby. I did, however, find enough time to create a new character and get as far as starting on my garrison. I hadn't been able to play in months, so it was like coming home. Here are some screenshots of my first day back in Azeroth.
Screen shots from Azeroth 
Sure, i love my Blizzard games and play when I can, but the truth is that I am certainly no expert gamer. I know there are some of you out there who really know the world of gaming and I'm hoping that you will step forward and offer your expert opinions on your favorite games. No detailed gaming review, but I do have a new pattern to share !
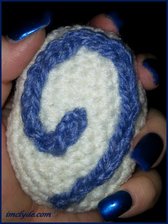
Clyde's Amigurumi Hearthstone Pattern Supplies: Crochet hook size: H/8/5 mm Worsted weight yard - White and Blue Stuffing and Yarn needle Round 1: Ch 2, 5 sc in first ch (do not turn. You will be working in a continuous spiral). Marking the first stitch of each round is advised! I found it helpful to make sure I counted the stitches in each round before going on to the next one just to make sure I was staying on track. Round 2: 2 sc in each stitch around (10 stitches) Round 3: *1 sc, 2 sc in next sc* around (15 stitches) Round 3: *2 sc, 2 sc in next sc* around (20 stitches) Round 5: sc in each sc around (20) Round 6: *3 sc, 2 sc in next sc* around (25 stitches) Another thing I found helpful was to write down which round I completed each time as it can be difficult to count your rounds when working in spiral. Round 7-14: sc in each sc around (25) Method I used for sc decrease = place hook under next sc, yo and pull through that stitch, then place hook under next sc, yo and pull through that stitch, yo once more and pull through all loops on hook. Round 15: *3 sc, sc decrease* around (20 stitches) Round 16: sc in each sc around (20) Round 17: *2 sc, sc decrease* around (15 stitches) Round 18: *1 sc, sc decrease* around (10 stitches) Round 19: sc decrease around (5 stitches) This is where you stuff with Poly-fill or other stuffing (more is better) I used end of the crochet hook to make sure stuffing was pushed evenly into the hearthstone. Round 20 : sc decrease until down to 1 stitch. Fasten off and secure ends. You may want to shape a bit with your hands and squeeze the stuffing into the areas that provide the exact shape you are looking for. To make the swirl design, I used a blue worsted weight yarn and chained 35-40 (depends on your tension and how long you want your swirl to be). After finishing the chain, leave a tail that is at least twice as long as your chain before cutting yarn. Lay out the chain in the design you want. I used straight pins to hold it in place (just don't squeeze the hearthstone too tightly while finishing your design, or you may end up with drops of blood on your hearthstone!) Once the design is laid out as you want it, use the yarn needle with the long tail of yard to secure the design to your hearthstone using up and down stitches in the middle of each stitch on the blue chain. Hide ends. Please feel free to ask any questions you may have about this pattern in the comments. I am thinking I may hang my hearthstone from my rearview mirror (after putting a few drops of my favorite essential oil blend into the stuffing!) If you make your own hearthstone, please share a picture. I'd love to see. You are welcome to share this pattern with others, but please provide a link back to this post if you share it anywhere online. As promised earlier, here are links to some of the other patterns that I found out there that gave me inspiration to try making one of my own. http://www.ravelry.com/patterns/library/hearthstone---world-of-warcraft $4
http://www.sabrinasomers.com/hearthstone-amigurumi.php 4 EUR http://www.ravelry.com/patterns/library/amigurumi-wow-hearthstone Free .pdf download This one is worked in 2 halves and then sewn together, but has the shape I liked http://www.ravelry.com/patterns/library/wow-hearthstone $1
0 Comments

I have been reading about this Oil Cleansing Method for the last few years on various blogs and online articles. My initial reaction was, "Yeah, like I need MORE oil on my skin". I actually have combination skin, but keeping my makeup from sliding off before the end of the day has always been a challenge. In addition to that challenge, I was still having to deal with occasional acne and blackhead problems and troublesome dry, flaky patches. The very last thing I wanted to put on my face was oil. I often used harsh cleansers on my face in an attempt to keep oily areas under control and used products on my face designed to inhibit oil but it was an ongoing battle and the dry areas of my face were getting pretty bad. My age was definitely showing in my skin. I would try expensive moisturizers on the dry areas but the only ones I really thought were helping were just too expensive for me to make a regular part of my daily routine.
I had been treating myself to occasional trips to a nearby spa for relaxing time in the jacuzzi and sauna area. I would splurge on a massage or pedicure once in a while so I decided I would treat myself to my first real spa facial. It was awesome and the aesthetician was very professional and knowledgeable. She told me something about my skin that truly surprised me. She said that my skin was dehydrated and lacked deep moisture. I asked her how that could be when I struggled so much with oily areas. She explained that the excess oil production was caused because I was regularly stripping away the natural oils in my skin and not replacing that with the proper moisturizer. hmmm. I had long ago learned that over-washing my hair caused it to be more oily. She confirmed that this is based on the same principle. My body was working overtime trying to replace the natural oils that I was scrubbing away. Of course she set me up with some amazing natural cleanser, moisturizer, and face serum. It was some awesome stuff and while I did make the initial purchase, I knew that I would not be paying that price for face products on a regular basis. The next time I ran across someone on the internet talking about the oil cleansing method I figured it sure wouldn't hurt to try. Here is the basic method I used:
BASIC OIL CLEANSING METHOD
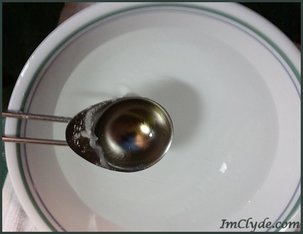
Get that hair out of the way with a headband Apply a couple tablespoons of oil to face with fingertips and gently massage until entire face is covered (I chose organic coconut oil but I will list some other popular oils later in this post) Soak an absorbent washcloth with hot water (not too hot!) and wring out excess water while still leaving it pretty wet. Lay the steamy cloth over your face and enjoy the warmth until cloth cools to room temperature (doesn't take long) Gently wipe face with cloth and then repeat the Steam/Wipe until your face feels clean.
The first time I tried this I thought my skin felt kind of oily, but resisted the urge to steam/wipe a 4th time. Literally within a couple of minutes my skin had soaked up any trace of oil from the surface and I had soft, smooth skin that wasn't the least bit greasy. It was only a quick step from the basic method to adding my favorite essential oils and even other natural ingredients (like organic honey) to mix up my own face cleansers at home. I no longer have problems with acne breakouts, I no longer have problems with dry skin or oily skin, (my makeup will still slide off after a day of Mississippi summer heat - but that's just because the heat and humidity melt it off!) I immediately began formulating my own facial cleansers, masks, toners and serums using essential oils and other natural ingredients with great results. I never dreamed that I would ever be cleansing my face with oil twice a day, but I can't imagine doing it any other way now. I'm convinced :)
Some Oil Options for your OCM routine
The above list is only a very short list of options and the descriptions of each are by no means exhaustive. The benefits shown are just a few of the many benefits of each that I have selected to share as they relate to skin care specifically.
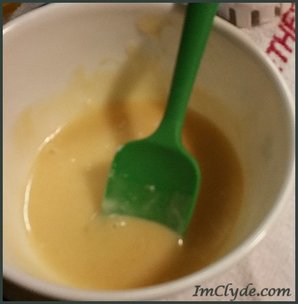
I recommend that whatever carrier oil you choose, that you make sure it is 100% pure, and preferably organic, for greatest benefit. All of the above oils are ones that I have used in my beauty recipes and I love them all. Since I began making my own oil cleansers and beauty products with essential oils I have seen such a dramatic improvement in my skin. I will share here one of the cleanser recipes I've made. I chose this one because it is the one I am using today. Coconut-Honey Anti-Aging Cleanser
INGREDIENTS:
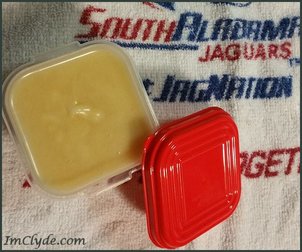
4 Tbs. Organic Coconut Oil 2 Tbs. Organic Honey 1 Tbs. Jojoba Oil 4 drops Frankincense Essential Oil 2 Drops Geranium Essential Oil 2 Drops Copaiba Essential Oil 2 Drops Lavender Essential Oil Small container (I used a little plastic container I got at the dollar store. I recommend a glass container, but I knew this wouldn't last long enough for the essential oil to degrade the plastic!) TOOLS: Small container of really hot water Metal measuring Tablespoon Spatula or whisk for mixing
Links to items mentioned in this post:
Carrington Farms Organic Coconut Oil
Billy Bee Organic Honey Plant Therapy Jojoba Oil Variety Pack of Carrier Oils This is a handy, reasonably priced set that will give you a variety to try. (Fractionated Coconut oil, Avocado oil, Sweet Almond oil & Grape Seed oil) NOTE: Fractionated coconut oil remains in a liquid state regardless of temperature. If you choose to use fractionated coconut oil in this recipe, there will be no need to melt and your final product will be more liquid in nature than solid. It will still work wonderfully, just make sure you put it in a container that will not leak and may be more prone to separating because the honey is so much heavier. The essential oils used in this particular recipe came from Young Living. You can get a customer account at this link: Young Living Essential Oils or contact your Young Living Distributor. I also use oils from Edens Garden. You can find their oils at amazon using the following link:
You can also order directly from their website: www.edensgarden.com
If you decide to give this recipe a try, I'd love to hear how you like it. Regardless of where you purchase your ingredients, please be sure to use high quality for the best results. Feel free to share your thoughts in the comments.
I have made other soap bags of different sizes and design, but particularly like the compact size and how the little bumps massage the skin while I'm getting clean. I was going to get out my boxes of finished items that I have stashed in the back so I could share pictures of the other soap bag designs I have made; but just getting to the boxes was more of a task than I felt like tackling today! Feel free to contact me with any questions if you decide to try the pattern and find yourself with questions. Clyde's Pattern for Soap Saver Massage BagMaterials I used: US – J/10 (6.0 mm) hook I used Cotton “Peaches & Cream” for the multi-color ones. The solid Yellow was a little bit heavier cotton yarn from my stash that has no identifying tags. I used what I’m gonna call a Bubble Stitch (Bubble) to make the bumps on the front. I had used a similar technique on a blanket that is still one of my favorites. Of course I couldn’t find the pattern for that blanket that had the exact name and instructions for the stitch – but after some trial and error I think I got it close enough for my purposes. Instructions for Bubble: *Yo, insert hook into st, pull up a loop* 3 times, working in the same st each time. This should leave you 8 loops on the hook when you are done. Yo and pull through all but 1 of the loops, then yo one more time and pull through the two loops left. NOTE: If you want larger bubbles then just add one or two more yo (4 or 5) before pulling through. Row 1: Ch 8. Starting in the 2nd ch from hook, hdc in each ch to end. Turn. (7 hdc) Row 2: Ch 1, hdc in each st to end of row. Turn. (7 hdc)  From this point on you'll work in rounds (around the edges of the rectangle made from rows 1 and 2.
Round 2: Ch 1. *Sc in next st, dc in next st* 4 times. Sc in next 1 st. **Bubble in next st, sc in next 2 sts** 2 times. Bubble in next st, 1 sc in next st, dc in last st, and join with sl st to first sc. Turn. (18 sts)
 Round 3: Ch 1. Start in the last dc (not the sl st) *Sc in next st, dc in next st* 9 times. join with sl st to first sc. Turn. (18 sts) Round 4 – 9: Repeat Rounds 2 & 3 three times. Round 10: Ch 2, dc in each st. Turn. (18 dc) Round 11: Ch 1, hdc in each st (18 hdc). Tie off and weave in the tail. To make a Drawstring: Chain 50 (keep chain tight). Weave through top of Round 10 tie knots in ends of each side and and trim. You can leave drawstring with 2 ends to make a bow, or tie the 2 ends together to make a loop for hanging in your shower. Because the cotton yarn holds water so well, I always hang mine from one of the shower curtain hooks in the shower so it will dry better. When it dries, the soap will be stuck to the inside of the bag until you soak the bag again the next time you are in the shower/bath. Now you can add your favorite soap and it’s ready to go! Here are links to some other free Soap Saver patterns you may want to try: "Absolutely Easy Soap Saver" by Rachel Chol at Crochetspot.com Soap Saver Pattern at Swirls & Sprinkles Blog Ribbed Soap Saver from crochetncraft.com Crochet Soap Saver (also from Crochetncraft.com) Pampering Massage Soap Saver by Tamera Kelly from Moogly - (this one is quite similar to the one I used) Easy Soap Saver Crochet Pattern by Amy Ranmarine from thestitchinmommy.com (good beginner pattern) If you have a favorite Soap Saver pattern of your own that you would like to share, feel free to post a link in the comment section. I've enjoyed seeing all the different variations on this popular item.
|
Categories
All
Archives
December 2018

AuthorI'm a curious-by-nature 50-something with random interests. Come visit often to see what the latest topic is.  |


 RSS Feed
 My Favorite Jars!